2 min to read
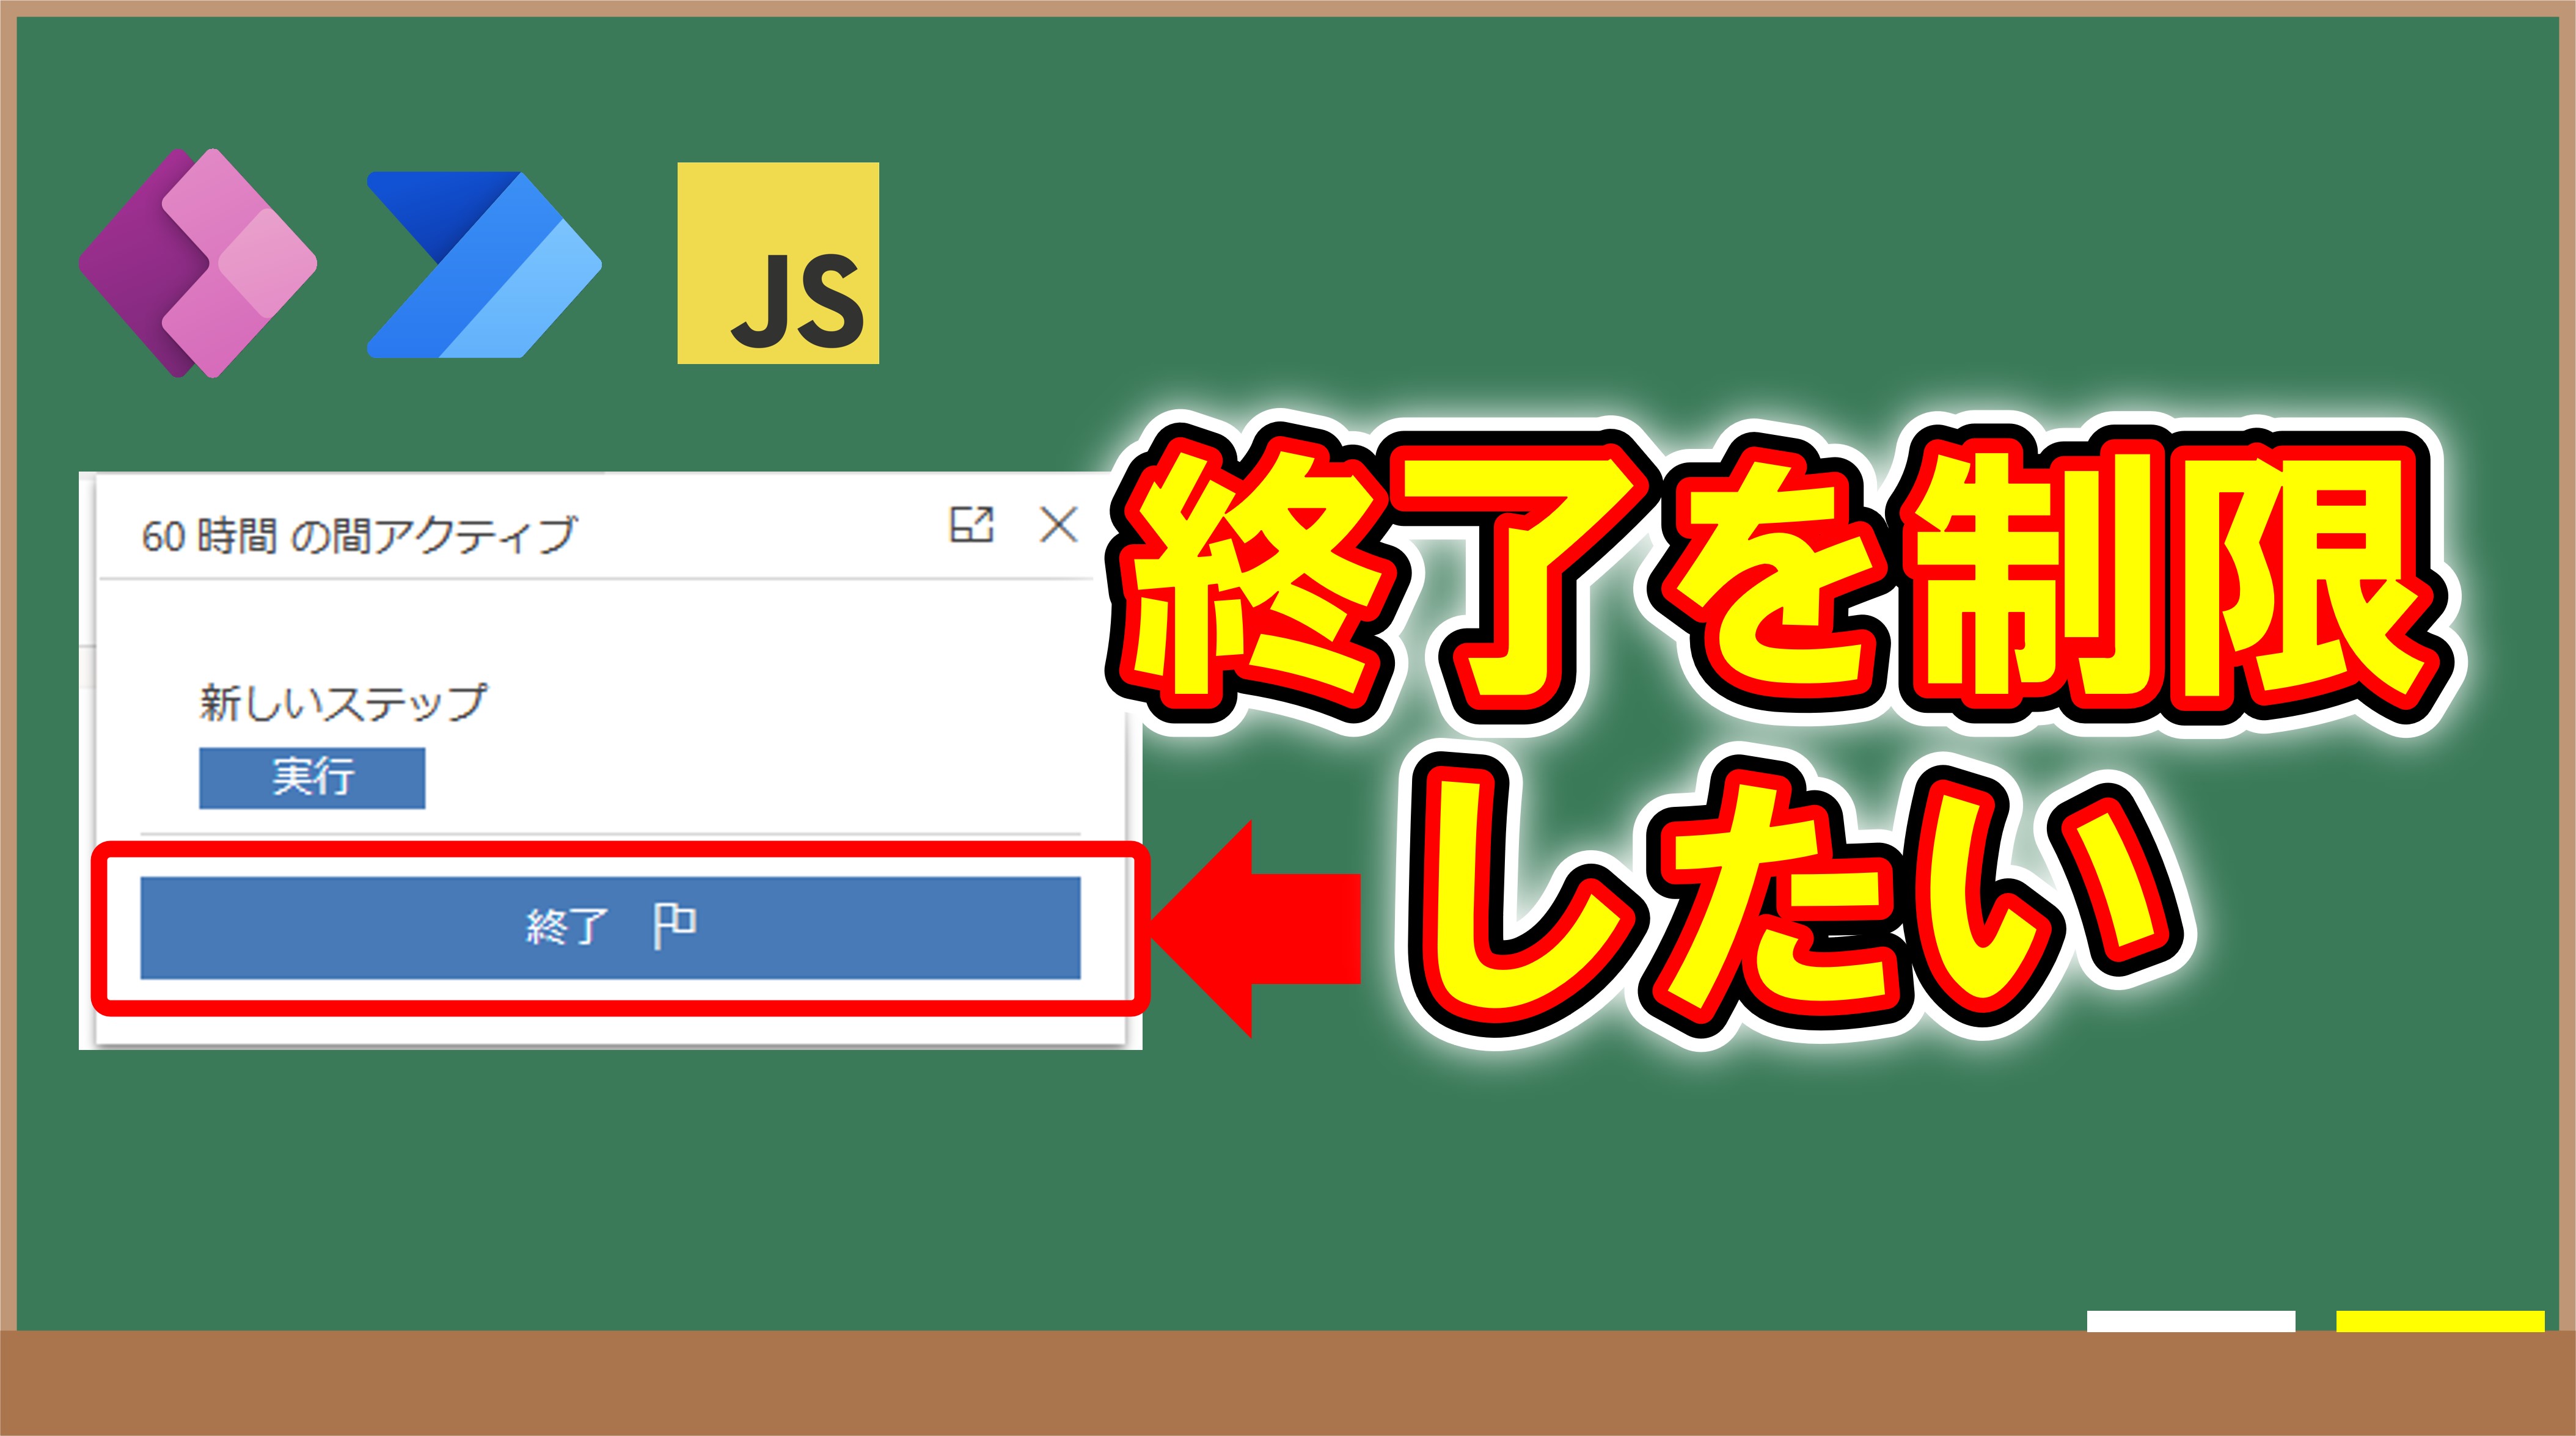
Business Process Flow で終了を押したときに JavaScript を実行する方法
概要
前回のブログでは、ビジネスプロセスフローを先に進めたり、戻らなくさせたりといった内容をご紹介しました。この場合最後のステージで終了する際には動作しません。そのため例えば前回のコードを総務ロール以外は Business Process Flow を終了させないようにするといったことはできません。
理由は OnPreStageChange はあくまでステージが移動したとき(移動しようとしたとき)にしか実行されないからです。最終ステージの場合終了という状態は変化しますが、ステージは移動しません。そのため終了時には前回のコードは実行されない形になります。
今回は、終了を押したときにもイベントが実行されるようにコードを追加していきます。
前回のブログ
ビジネスプロセスフローとは
Power Automate は、Microsoft が提供するクラウドベースのサービスで、さまざまなアプリケーションやシステム間でデータをやりとりしたり、自動化したりすることができます。Power Automate には、フローと呼ばれる自動化の単位がありますが、その中でもビジネスプロセスフローという種類があります。
ビジネスプロセスフローとは、特定の業務やタスクを実行するために必要な一連の手順を定義し、ユーザーにガイドする機能です。例えば、営業案件の獲得や顧客対応の流れなどをビジネスプロセスフローとして作成することができます。ビジネスプロセスフローは、Power Apps や Dynamics 365 などのアプリケーションに組み込むことができ、ユーザーは画面上に表示される手順に沿って作業を進めることができます。
ビジネスプロセスフローのメリットは、以下のようなものがあります。
- 業務の標準化や品質向上に貢献できる
- 業務が標準化されるためユーザーのトレーニングやサポートが容易になる
- ビジネスルールや条件分岐などを設定することで、業務の効率化やエラーの防止ができる
- 正しい流れで入力されるのでデータの収集や分析がしやすくなる
終了時にも JavaScript を実行させる方法
今回は、onPreProcessStatusChange イベントを利用します。このイベントは Pre となっているので、プロセスのインスタンスの状態が変化する 前 に発生します。当然 OnProcessStatusChange もあります。こちらは状態が変化したときに実行されるイベントになります。
アクティブや非アクティブ等状態が変わったときに実行されるイベントになります。これを追加したコードがこちらになります。
let Acc = {};
Acc.formEvents = {
    form_load: function (e) {
        const fc = e.getFormContext();
        fc.data.process.addOnPreStageChange(Acc.formEvents.handlePreStage);
        fc.data.process.addOnPreProcessStatusChange(Acc.formEvents.handlePreState);
    },
    handlePreStage: function (e) {
        // get the event arguments
        const bpfArgs = e.getEventArgs();

        if (bpfArgs.getDirection() === "Previous") // back stage movement is not allowed; You can stop it depending on custom business logic as well
        {
          bpfArgs.preventDefault();
          const previousAlertStrings = { confirmButtonLabel: "OK", text: "Back stage movement is not allowed", title: "Sample title" };
          const previousAlertOptions = { height: 120, width: 260 };
          Xrm.Navigation.openAlertDialog(previousAlertStrings, previousAlertOptions);
          return;
        }

        if (bpfArgs.getDirection() === "Next") { // only next stage movement is allowed. You can stop it depending on custom business logic as well
            // stop the stage movement
            bpfArgs.preventDefault();
            const nextAlertStrings = { confirmButtonLabel: "OK", text: "Next stage movement is not allowed", title: "Sample title" };
            const nextAlertOptions = { height: 120, width: 260 };
            Xrm.Navigation.openAlertDialog(nextAlertStrings, nextAlertOptions);
            return;
        }
        // you can also play with the other properties of eventargs
        // get the stage - bpfArgs.getStage();
        // get the steps - bpfArgs.getStage().getSteps();
    },
    // -------- 追加分 ---------------- //
    handlePreState: function (e) {
      // 実行したいコード
      // 例えばフォーム上部にエラー通知を表示するには
      const formContext = e.getFormContext();
      const bpfArgs = e.getEventArgs();
      formContext.ui.setFormNotification("エラーメッセージ", "ERROR", "managerError");
      bpfArgs.preventDefault();
    }
    // -------- 追加分 ---------------- //
}
あとは前回の要領で BPF の実行を止めたり、警告を表示したりといったことが可能です。 注意点としては、 getState で状態を取得できますが実行した時点での情報しか取得ができない点に注意が必要です。(終了を押したら active が取れる)
おまけ
ユーザーのセキュリティロールを取得する
セキュリティロールを取得するにはuserSettings を利用します。複数取得されるのでコードを書く場合はこんな感じになります。
// Get the security roles collection
const roles = Xrm.Utility.getGlobalContext().userSettings.roles;

// Initialize an empty array to store the role names and IDs
let roleInfo = [];

// Loop through the roles collection
roles.forEach(function(role, index) {
  // Get the role name and ID
  const roleName = role.name;
  const roleId = role.id;

  // Add the role name and ID to the array
  roleInfo.push(roleName + " (" + roleId + ")");
});

// Join the array elements with a comma character
const roleInfoString = roleInfo.join(",");

// Display the role information in the console
console.log("Your security roles are: " + roleInfoString);
このコードはセキュリティロールの一覧を文字列として連結してconsoleに表示する例ですが、これを応用して例えば特定のステージは特定のセキュリティロールを持っていないと実行できないようにするといったことも可能かと思います。
例えば、システム管理者と部長ロールを持っている場合は true そうでなければ false を変えるような式の場合は
var roles = Xrm.Utility.getGlobalContext().userSettings.roles;

// Initialize a variable to store the result
var hasRole = false;

// Loop through the roles collection
roles.forEach(function(role, index) {
  // Get the role name
  var roleName = role.name;

  // Check if the role name is システム管理者 or 部長
  if (roleName == "システム管理者" || roleName == "部長") {
    // Set the result to true
    hasRole = true;
  }
});

// Return the result
return hasRole;
roleName を使っていますが、もちろん id の方を使ってもよいと思います。(ソリューションをエクスポートなどして環境を移動する場合は名前の方がよさそう)

Comments